
 Author’s Homepage:Click Here
 Linux Basics (Beginner):Click Here
Advanced Linux Management, Protection, and Clustering:Click Here
 Firewalld Firewall in Linux:Click Here
 ️ Creation Time: July 24, 2024 at 2:10 PM
 Article Quality: 93 points
Table of Contents
Establishing Time Synchronization Environment
3.Configuring Traditional Replication with Single Master
4.Testing Master-Slave Synchronization
 Cool Website Recommendations

A few days ago, I came across an outstanding
artificial intelligence learning website. It’s easy to understand, funny and engaging, so I couldn’t help but share it with everyone. Whether you’re interested in AI or machine algorithms, this site is worth checking out. Click here to visit! https://www.captainbed.cn/sis
Office AI Tool Recommendations
Click on the above link to redirect to the official website
1. All node configurations
-
Configure IP address, gateway, DNS, and hostname
Set up network-related information through appropriate configuration files or commands to ensure proper communication between all nodes. -
Stop and disable the firewall
These commands are used to shut down SELinux and the firewall to prevent them from blocking communication between nodes.
-
Download required components
Install development tools and file transfer tools to ensure the system has the necessary development and transfer environment.
Build time-synchronized environment
Main node
-
Install NTP
Install the NTP service to ensure time synchronization.
-
Configure NTP
Add the following two lines:
Configure NTP service to use local time as a reference.
-
Restart service and set to start automatically on boot
Restart the NTP service and set it to start automatically at boot to ensure continuous operation of the time synchronization service.
From Node
-
Install ntpdate
Install the ntpdate tool to manually synchronize time.
-
Synchronize Time
Use NTP server IP to synchronize time. For example:
Lingban AI Free ChatGPT4 Artificial Intelligence Browser Plugin (Multi-functional)
Open Method:Click!![]() https://ilingban.com/browser_extension?from=smqnz
https://ilingban.com/browser_extension?from=smqnz
(Click to add to Edge browser), very convenient! You can try it!
2.MySQL Database Installation
-
Download MySQL 5.7.29 installer package
Download the official MySQL installation package from the source.
-
Extract and create MySQL yum repository
Extract the installation package and create a local YUM repository.
-
Configure yum repository
Configure the local YUM repository for subsequent installation.
-
Refresh yum and install MySQL server
Install the MySQL server.
-
Start and change default management password
[/crayon]
Start MySQL and change the default management password.
mysqladmin –uroot –p password “Abc-1234” // Change the default password using Abc-1234
Start the MySQL service and change the default root user password.
3. Configure Traditional Replication Single Master
Master Server (master1)
-
Edit MySQL configuration file
Add the following content:
Set server ID and enable binary logging.
-
Restart MySQL service
Restart the MySQL service to apply configuration changes.
-
Create a user with replication permissions
Create a user for replication and grant necessary permissions.
-
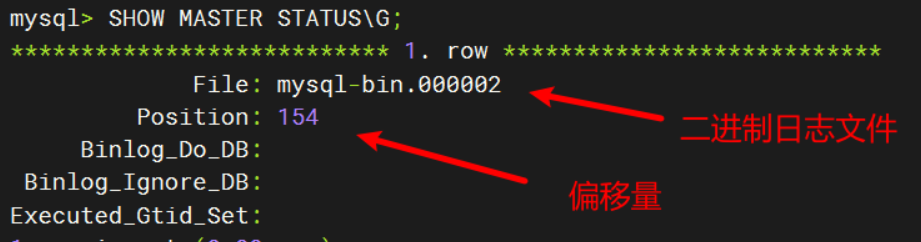
View master server status
Obtain binary log file and position to configure the slave server.
From Server (master2)
-
Edit MySQL Configuration File
Add the following content:
Set the slave server ID.
-
Restart MySQL Service
Restart the MySQL service to apply configuration changes.
-
Connect to Master Server
Configure the slave server’s replication information based on the master server status.
-
Start Slave Server
-
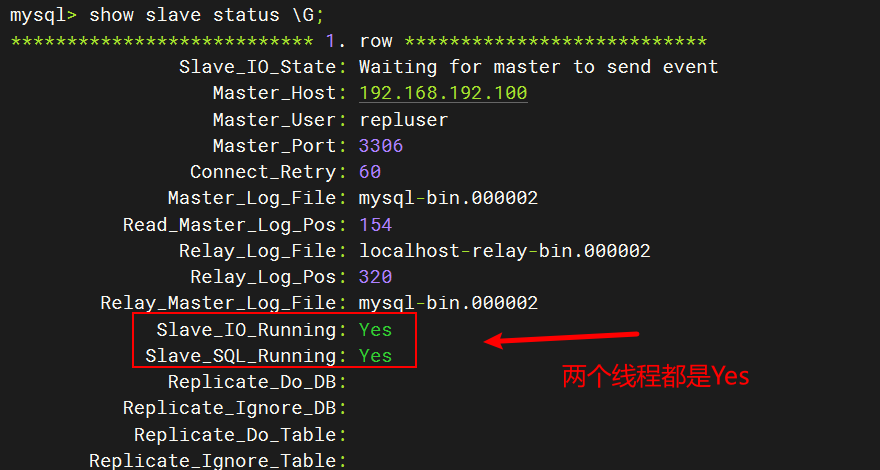
Check Slave Status
Check the slave server replication status to ensure successful connection and synchronization.
-
4. Testing Master-Slave Synchronization
Create the database and table on the master server, and insert data:
Check if the data is synchronized on the slave server:
The above operations ensure that the data on the master server is successfully replicated to the slave server, achieving master-slave synchronization.
Summary
Through this article’s introduction, we have successfully configured MySQL database master-slave replication on a Linux system, ensuring real-time data synchronization and backup. This not only improves data security but also provides convenience for future expansion and maintenance. We hope readers can apply the knowledge learned to further explore and optimize their own database management solutions, laying a solid foundation for more efficient business operations.
There are no shortcuts on the road to success; only continuous effort and perseverance. If you believe, like me, that effort brings rewards, please follow me, give me a thumbs-up, and embrace an even brighter tomorrow together!
“Every creation is a learning process. If there are shortcomings in this article, please understand. Your support and encouragement are my greatest motivation. Welcome to share your valuable opinions and suggestions to help me improve continuously.”
The Enigmatic Crying Man

Leave a Reply
You must be logged in to post a comment.